
DNS migrations can make or break your business operations—but they don’t have to be scary. This complete guide walks you through every critical step, from pre-migration planning and TTL optimization to protecting email continuity and troubleshooting common pitfalls. Whether you’re moving one domain or hundreds, learn how to execute faster DNS changes with minimal downtime and zero financial losses. Master the fundamentals, avoid enterprise-level mistakes, and keep your services running smoothly throughout the transition.
A DNS migration happens when you update your domain’s DNS records. Several scenarios may prompt you to migrate your DNS to a new server, and you’ll learn the most popular ones later in this article.
But regardless of why you need a DNS migration, a DNS downtime can add an extra task to your system admin’s plate and subtract a significant amount from your business’s bottom line.
This guide is created to help you confidently plan and execute DNS changes, whether you’re moving one domain or hundreds. Read on to learn the intricacies of executing faster DNS migrations with minimal financial losses.
DNS Migration Fundamentals: What You Need to Know First
A popular way to think of DNS is as the Internet’s address book. When someone types your domain name (like InMotionHosting.com) into their browser, DNS translates that name into an IP address that points to your server. This system lets internet users find your site, send emails, and connect to your services.
Types of DNS Migrations
Not all DNS changes are created equal. You may be:
Switching DNS hosts to take advantage of better features or reliability
Transferring your domain registrar for billing or management consolidation
Migrating web or email hosting, requiring DNS records to point to new servers
Re-architecting infrastructure in the cloud (e.g., AWS, Azure), which impacts how DNS is configured
Each procedure carries unique risks and steps, so understanding your specific migration type is key.
DNS Hosting vs Domain Registration: What’s the Difference?
Domain registration is your ownership of a domain name, managed through a registrar. DNS hosting refers to the service that stores and resolves your DNS records.
Your registrar might also offer DNS hosting, but they are separate functions. During migrations, you need to know where your DNS is currently hosted so you can export and reconfigure records properly.
Key DNS Records to Preserve
Losing or misconfiguring even a single record during migration can disrupt your operations. Pay close attention to the following:
A and AAAA records: Point your domain to your server’s IPv4 or IPv6 address
MX records: Direct email traffic to your mail server
CNAME records: Alias one domain to another (e.g., www to the root domain)
TXT records: Store data used for domain verification, SPF, DKIM, and DMARC policies
SRV, NS, and PTR records (for specific services or infrastructure setups)
Before you begin migration, create a full inventory of your existing records.
1. Pre-Migration Planning: Your Critical Preparation Checklist
Poor planning is the #1 reason for faulty DNS migrations. In the pre-migration stage, here’s what you should do:
Create a Comprehensive DNS Inventory
Start by documenting every DNS record linked to your domain. If your domain supports web apps, subdomains, third-party services (like payment processors or analytics tools), include them too. This inventory will become your source of truth during the migration.
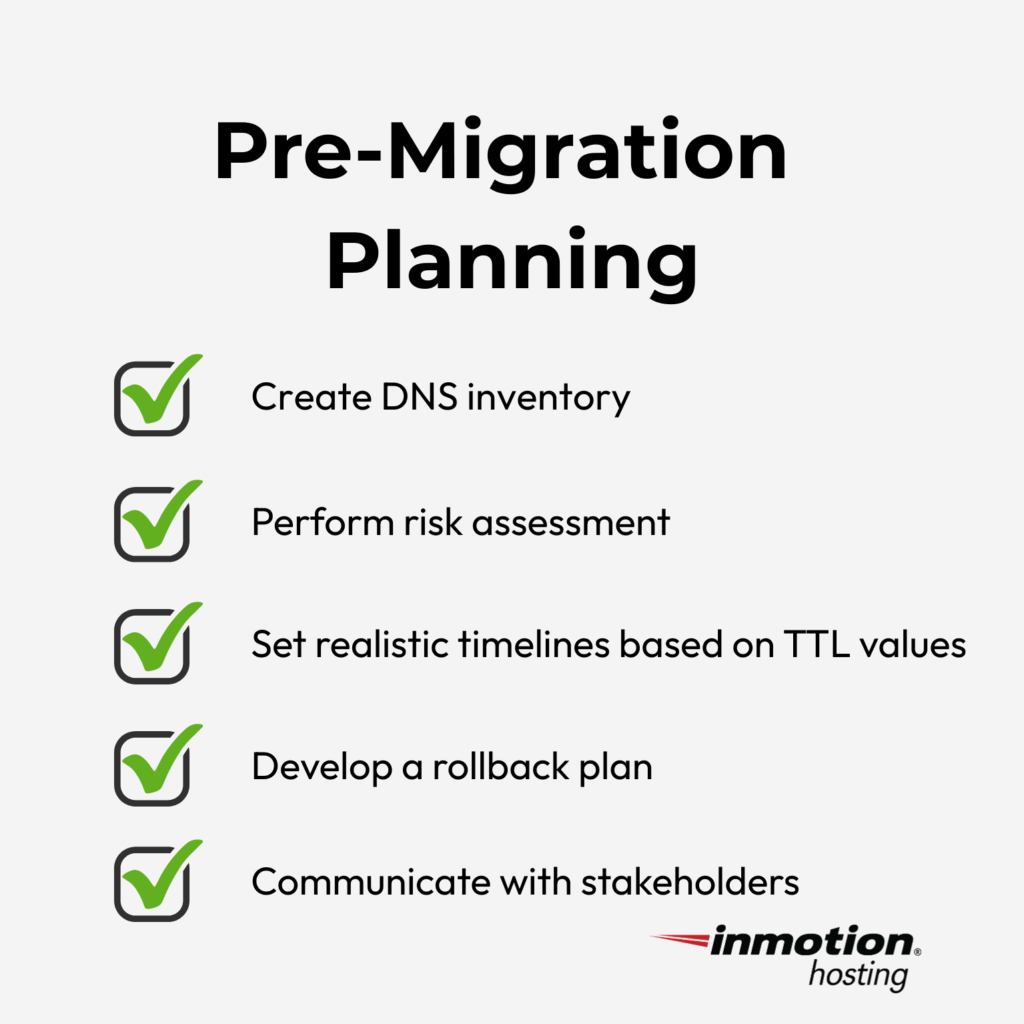
Perform a Risk Assessment and Impact Analysis
Run a check to see what systems would break if your DNS fails, even temporarily. For example:
Will users lose access to your login portal?
Will email stop flowing for key departments?
Will embedded apps or third-party integrations fail?
Tools like DNSstuff, IntoDNS, or security dashboards from your hosting provider can help visualize these dependencies before the migration begins.
Set Realistic Timelines Based on TTL
Time-to-Live (TTL) values define how long DNS information is cached by resolvers across the Internet. If you don’t plan around TTL, propagation delays can leave users stranded on outdated records.
Review each record’s TTL setting and adjust in advance. Lowering TTLs to 300 seconds (5 minutes) about 48–72 hours before migration allows faster updates when it counts.
We’ll cover TTL management in depth in the next section, but this step belongs in your pre-migration checklist.
Develop a Rollback Plan
Hope for the best. Plan for the worst.
A detailed rollback plan ensures you can quickly restore service if something breaks mid-migration. Your rollback plan should include:
A backup of all DNS records in a portable format (e.g., BIND or CSV)
An emergency contact list for internal IT and third-party vendors
Access credentials for both old and new DNS providers
Steps for reverting your nameserver changes
Even if you never use it, having a plan reduces stress and supports decision-making under pressure.
Communicate With Stakeholders
DNS migrations affect more than just your technical team. Notify everyone who needs to know, especially the marketing teams (so they can pause campaigns if needed), customer support (so they can answer questions if issues arise), and of course, email service providers, SaaS vendors, or other integrated partners.
Include a simple timeline and contingency plan in your comms. A short heads-up goes a long way in keeping teammates aligned and customers happy.
2. Strategic TTL Management: The Key to Smooth Transitions
DNS migrations often fail due to timing issues. And nothing controls timing in DNS quite like TTL, or Time-to-Live.
What Is TTL and Why Does It Matter?
TTL determines how long the old data remains after a change is made. If TTL values are too long, users may continue to hit outdated IP addresses or services, even after you’ve updated your records. That’s where outages and delays happen.
But with proper TTL planning, you can control how fast your DNS updates propagate, reducing uncertainty and ensuring a smoother cutover.
The Ideal TTL Reduction Schedule
Think of TTL like a countdown clock. Here’s how to set it up for a frictionless transition:
7 Days Before Migration: Audit TTL values for all critical records (A, MX, CNAME, etc.). Next, lower the TTL to 86400 seconds (24 hours) if they’re currently higher
3 Days Before Migration: Reduce TTL to 3600 seconds (1 hour)
24–48 Hours Before Migration: Reduce TTL to 300 seconds (5 minutes). This gives you the fastest possible propagation during the critical switch
Post-Migration: After verifying everything is stable, return TTL to 3600 or 86400 seconds to reduce DNS lookup overhead.
This staged approach helps you balance speed and control while minimizing cache conflicts.

Pro Tip: If your DNS provider doesn’t support granular TTL changes, consider migrating your DNS to one that does before beginning the broader migration.
3. Email Continuity: Protecting Your Critical Communications
It’s not uncommon for businesses to complete a successful website migration, only to find out days later that no one has received a single email. That’s because MX (Mail Exchange) records, which route email traffic, are DNS-dependent. If they’re forgotten, misconfigured, or updated out of sequence, email delivery can silently fail.
And because email issues aren’t always immediately obvious, the damage often goes unnoticed until it’s too late.
To ensure email continuity, follow this tested sequence:
Lower TTL on MX records 48 hours before migration to speed up propagation.
Verify the new mail server is operational before making any DNS changes.
Replicate all existing MX and supporting records (SPF, DKIM, DMARC, and relevant TXT records) on the new DNS host.
Switch over MX records during a low-traffic window, typically early morning or weekends.
Monitor delivery logs immediately after cutover using your mail service’s dashboard or command-line tools like dig and nslookup.
Pro tip: Don’t forget about supporting DNS records. Missing SPF or DKIM entries can send your emails straight to spam.
Testing Email Delivery During DNS Transitions
Before declaring success, test email send and receive functionality across:
Internal mailboxes ([email protected])
External recipients (Gmail, Outlook, Yahoo)
Email forwarding or alias services
Transactional systems (e.g., order confirmations, password resets)
Use tools like MXToolbox to check for delivery issues, DNS mismatches, or blacklisting.
Also, validate SPF, DKIM, and DMARC configurations to ensure your domain isn’t vulnerable to spoofing or blocked by mail providers.
Common MX Record Mistakes to Avoid
Even experienced sysadmins fall into these traps:
Omitting priority values or setting them incorrectly, causing mail delivery to fail or be delayed
Missing trailing dots in raw MX record inputs (some DNS panels require mail.domain.com. instead of mail.domain.com)
Forgetting to update SPF records to reflect new sending servers
Incorrect TTL values, leading to long propagation delays even after changes are made
Avoid these by double-checking each value and using your DNS provider’s documentation as a reference.
4. Step-by-Step Migration Process: Execution Best Practices
Once your DNS inventory is complete and your TTLs are optimized, it’s time to begin the actual migration. Let’s walk through a proven, phased approach.
Step I: Export and Verify All DNS Records
Start by exporting your current DNS zone file.
Then, validate what you’ve exported:
Are all required records accounted for?
Are there any legacy entries no longer needed?
Are TXT and SPF records formatted correctly?
Keep a backup of both the raw and cleaned versions. These are your fail-safes if rollback becomes necessary.
Step II: Sequence the Migration by Service Priority
Avoid an “all-at-once” switch. Instead, migrate by impact:
Web hosting (A, AAAA, and CNAME)
Email services (MX, SPF, DKIM, DMARC)
Third-party services (APIs, analytics, app subdomains)

Step III: Verify Between Each Migration Phase
After each group of records is updated:
Use dig, nslookup, or DNSChecker.org to confirm global propagation
Test real-world functionality: Can you load the site? Are transactional emails working?
Review server logs for new errors or warning flags
Pro tip: Never skip a verification step. Each checkpoint helps you isolate and resolve issues early, before they snowball.
Step IV: Use Load Balancers and Static IPs Strategically
If you’re managing a large or high-traffic site, don’t underestimate the value of infrastructure tools.
Load balancers allow traffic to be split between old and new environments, useful for seamless cutovers. Static IPs let you pre-map A records to your new environment ahead of time
These tools are particularly valuable on dedicated servers, where you control the networking layer and can configure fallbacks or traffic rules.
Step V: Update Nameserver Records
When moving to a new DNS provider, this is your final and most sensitive step. Wait until:
All records are fully replicated and verified
Your TTL values have been lowered as planned
Monitoring is active, and rollback plans are documented
Once nameservers are updated at the registrar level, global propagation begins, typically taking 24–48 hours. During this time, closely monitor DNS traffic, site uptime, and service behavior across regions.
5. Monitoring DNS Propagation: Knowing When You’re Done
After your DNS migration, propagation is the final step. Use these tools to check where your records have been updated:
dig / nslookup: Command-line tools for querying DNS
DNSChecker.org and WhatsMyDNS.net: Global visual maps
MXToolbox: Focused on mail-related records
Enterprise teams may also set up automated probes through Pingdom or Uptrends.
How to Interpret Propagation Results
Most propagation tools display results from multiple global DNS resolvers. Here’s what the responses mean:
New value shown: Resolver has updated successfully
Old value shown: Still cached from earlier TTL
No result: Likely a misconfigured record or temporary resolver issue
If at least 80–90% of locations display the updated values, and your key services are functional, you’re close to completion.
Regional Variations in Propagation Time
DNS propagation speed varies by:
ISP-level caching behavior
Record type (A and CNAME resolve faster than TXT or MX)
Device-level DNS caching in browsers or operating systems
Typically, A and CNAME records resolve within 1–4 hours. TXT and MX records may take 12–48 hours.
When to Consider the Migration Complete
You can close the migration when:
All services (web, email, third-party tools) function correctly
Monitoring shows global consistency
No user issues are reported
Logs confirm stable access to the new environment
InMotion Hosting Tip: Speed Up with Smart A Record HandlingOne method InMotion Hosting often recommends: update A records on your old DNS host to point to the new server before switching nameservers. This routes traffic to the right destination even before full propagation completes; a practical way to minimize downtime during transitions.
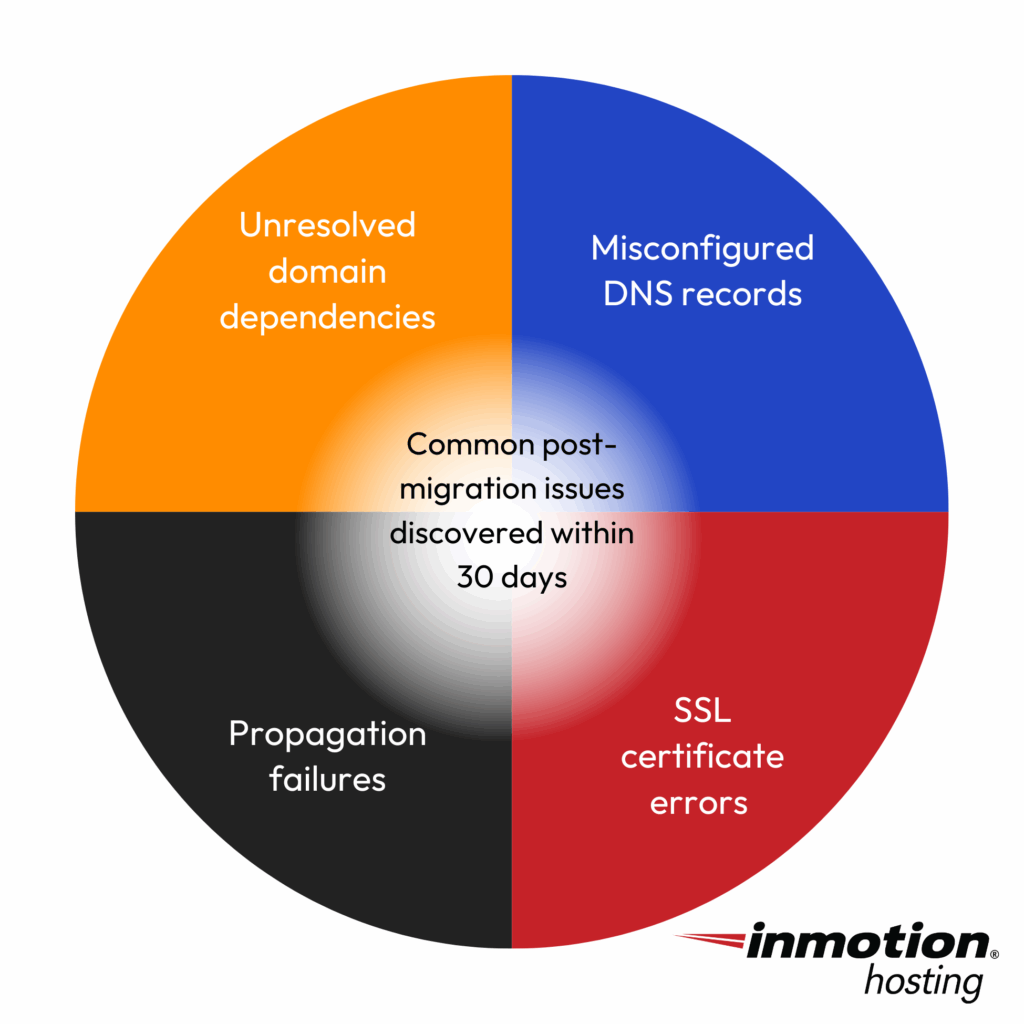
6. Troubleshooting Common DNS Migration Issues
Even well-planned DNS migrations can hit a few snags. Knowing what to look for (and how to fix it) can mean the difference between a minor hiccup and prolonged downtime.
Below are the most common DNS migration issues, along with proven ways to resolve them.
Partial Propagation Problems
The symptom: Some users reach your new environment, while others still land on the old one.
The cause: This typically happens when DNS changes haven’t fully propagated due to lingering TTL values or caching at the resolver level.
The fix:
Double-check that TTLs were lowered before the migration
Use tools like dig or DNSChecker.org to confirm where propagation is lagging
In the short term, guide affected users to flush their DNS cache or switch to a public resolver like Google DNS (8.8.8.8)
Record Conflicts
The symptom: You’ve added the right records, but your services still don’t work as expected.
The cause: Conflicting records (like multiple A records pointing to different IPs or overlapping CNAMEs) can override or cancel each other out.
The fix:
Audit all newly added records against the old zone file
Remove duplicates or deprecated entries that may be interfering
Ensure that each subdomain only uses one record type for redirection (e.g., CNAME or A, not both)
CNAME and Apex Domain Challenges
The symptom: The root domain doesn’t behave the same as the www subdomain.
The cause: DNS standards don’t allow CNAME records at the apex/root level (e.g., yourdomain.com). If you’ve configured www.yourdomain.com with a CNAME but tried to apply the same to the root, you’ll run into issues.
The fix:
Use an A or ALIAS/ANAME record at the root domain to point to the correct IP address
Leave the CNAME for the www subdomain
Confirm your DNS provider supports ALIAS or ANAME for root-level flexibility
SSL Certificate Complications
The symptom: Your website throws HTTPS or certificate errors after the DNS switch.
The cause: SSL certificates are tied to specific domain names and IPs. If your new server doesn’t have the correct certificate installed or the DNS hasn’t fully propagated, users may see security warnings.
The fix:
Install valid SSL certificates on the new host before redirecting traffic
Use a wildcard or SAN certificate to cover multiple subdomains
If using Let’s Encrypt, ensure the DNS has resolved before triggering validation
DNS issues can be frustrating. But if you’re hosting with InMotion, our support team is available 24/7 to help diagnose and resolve migration challenges as they arise.
7. Special Considerations for Enterprise DNS Migrations
For enterprise teams, DNS migrations are trickier. The stakes are higher, the infrastructure is more complex, and the margin for error is razor-thin.
DNS Migration in Cloud Environments (AWS, Azure, GCP)
Cloud-native platforms like AWS Route 53, Azure DNS, and Google Cloud DNS offer high-performance resolution, but their configuration models differ significantly from traditional hosting.
Common challenges:
Complex routing policies (weighted, geolocation-based, failover)
Multi-zone record sets tied to auto-scaling or load-balanced infrastructure
Tight integration with IAM (identity access) for DNS record changes
Best practices:
Audit your cloud zones and document dependencies tied to other cloud services (e.g., Lambda, App Services, Cloud Functions)
Use Infrastructure as Code (IaC) tools like Terraform to manage and migrate DNS programmatically
Backup all zone configurations before initiating changes, especially when working across multiple providers
Working with CDN Providers During DNS Transitions
If your site relies on CDNs like Cloudflare, Akamai, or Fastly, your DNS doesn’t just resolve to a web server, it points to an edge layer that manages caching, SSL termination, and security.
To avoid breaking delivery:
Replicate all relevant CDN settings before switching DNS
Confirm SSL certificates and caching policies match across both environments
Coordinate DNS cutover with your CDN provider to prevent edge routing issues
In some cases, a “gray cloud” configuration (or, bypassing CDN temporarily) can help test and verify the new environment before fully re-enabling CDN features.
Automating Large-Scale DNS Migrations
Manual updates don’t scale when you’re managing hundreds of records or domains. For large migrations, automation is essential.
Tools and techniques to consider:
Terraform + provider-specific modules (e.g., AWS Route 53 or Cloudflare DNS modules)
PowerShell and Bash scripts using APIs from providers like Google Domains, GoDaddy, or Namecheap
Zone file converters that can transform records between formats (BIND, JSON, CSV)
Always test scripts in staging environments and validate outputs before running updates in production. One malformed record pushed at scale can take down a business-critical system.
Why Enterprise Migrations Are Different and How InMotion Hosting Helps
When the risks include broken transactions, SLA breaches, or loss of user access in global markets, a “safe enough” migration isn’t good enough.
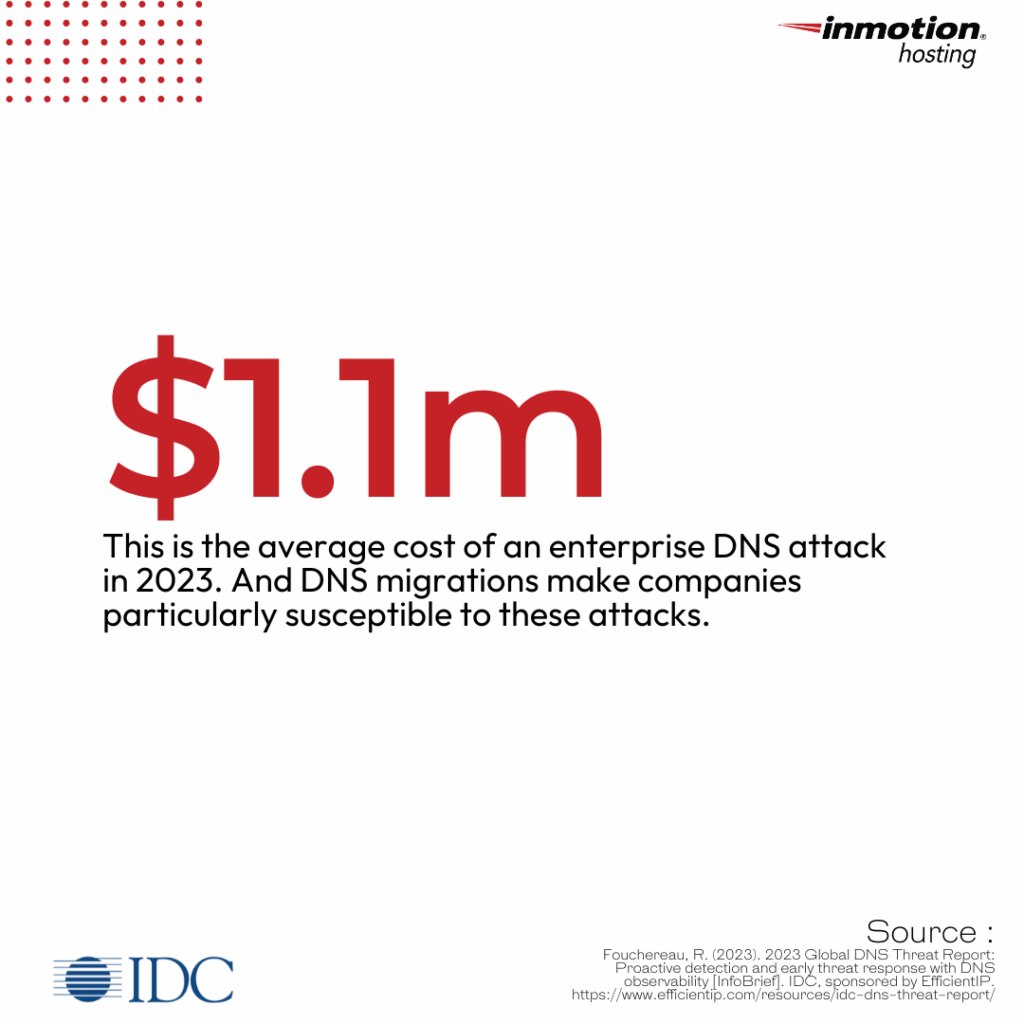
Here’s what’s interesting: DNS threats on enterprise organizations with over 500 employees are on the rise. Take a look at the 2022 vs 2023 numbers, as obtained from the International Data Corporation:
At InMotion Hosting, we’ve supported enterprise migrations for SaaS platforms, multi-brand eCommerce operations, and cloud-first teams. We understand the architectural complexity, the cross-team coordination, and the need for zero downtime execution.
From designing hybrid migration plans with DNS fallbacks to pre-validating CDN and SSL configurations, our engineers can help you orchestrate every phase with precision, so that nothing slips through the cracks.
8. Post-Migration Best Practices
A successful DNS migration doesn’t end the moment records propagate. The final step is reinforcing your infrastructure, validating functionality, and creating safeguards that keep you protected long after the cutover.

Here’s how to stay ahead of those pitfalls:
Validate the Migration Was Fully Successful
Once propagation has completed, perform a final, comprehensive validation:
Load your website from multiple global endpoints
Send and receive emails from both internal and external accounts
Test integrations like CRMs, analytics tools, eCommerce platforms, and payment gateways
Confirm logs show expected traffic and service availability
Update Internal Documentation and Transfer Knowledge
After the migration:
Update all internal documents (network diagrams, service guides, credentials)
Archive a copy of your new DNS zone file
Annotate any changes made during the migration for future audits
Share a post-mortem with your team detailing what worked, what didn’t, and what should be repeated or avoided
Implement Long-Term DNS Management Practices
Once everything is stable, shift from reactive to proactive:
Set TTLs back to default values (typically 3600s or 86400s) to reduce unnecessary lookups
Use version control or backup systems for zone files
Audit DNS records quarterly to remove obsolete entries and validate integrity
Set up health checks and alerts for DNS resolution failures or propagation delays
DNS should never be a set-it-and-forget-it service.
Monitor for Late-Stage Issues
Post-migration anomalies can surface gradually:
Emails flagged as spam due to misconfigured SPF or DKIM records
SSL renewals are failing because of missing CAA or ACME challenge records
CDN performance degrading due to caching conflicts or misrouted DNS queries
Use DNS monitoring tools to watch for unexpected behavior. Services like StatusCake, Catchpoint, and Nagios can alert you to resolve failures or traffic anomalies in real-time.
Conclusion
Whether you’re shifting a single domain or migrating hundreds across environments, success hinges on one thing: preparation.
The more clarity you build into the process, the smoother the handoff from old to new.
At InMotion Hosting, we specialize in helping businesses handle migrations the right way — whether you’re managing eCommerce sites, SaaS platforms, or cloud-native deployments. From support with DNS cutovers to multi-site coordination and real-time troubleshooting, our team is here to help you move without missteps.
Ready to get started?
Seamless Website Migrations Done Right – For Free
Moving your website shouldn’t be stressful. InMotion Hosting is the #1 choice for website migrations, offering free expert migrations for cPanel, WordPress, and even complex server-to-server transfers. Let our team handle the heavy lifting so you can stay focused on your business.
Start Your Free Migration Today